

A Guide to Using Layers
Layers are one of the fundamental aspects you can employ when it comes to non-destructive image editing.
The use of layers has become the very core of image editing since its introduction in the early ’90s. As you might imagine, layers are exactly what they sound like. You can have a number of separate elements, each on its own layer, that are stacked one on top of the other. When all viewed together, they create the final image.
The advantage of using layers is clear. It means you can change an element on one layer only and not have an impact on the rest of the image. It also means that you can take an image and duplicate it on another layer and perform any edits you want on that one in the knowledge that the base image will remain untouched in case it doesn’t turn out quite as you had hoped. Within Elements, there are four main types of layers. There is the basic pixel layer which contains the main photo elements of the project. There are text layers where you can type text and change the size and colour. Then there are fill/adjustment layers that are designed to affect the layer below it such as changing the saturation or brightness of the layer below, or just adding a colour to that layer. Finally, there are vector layers that contain scalable graphical elements such as shapes and work paths. Each layer type can also have a mask added to it so only part of that layer can be seen.
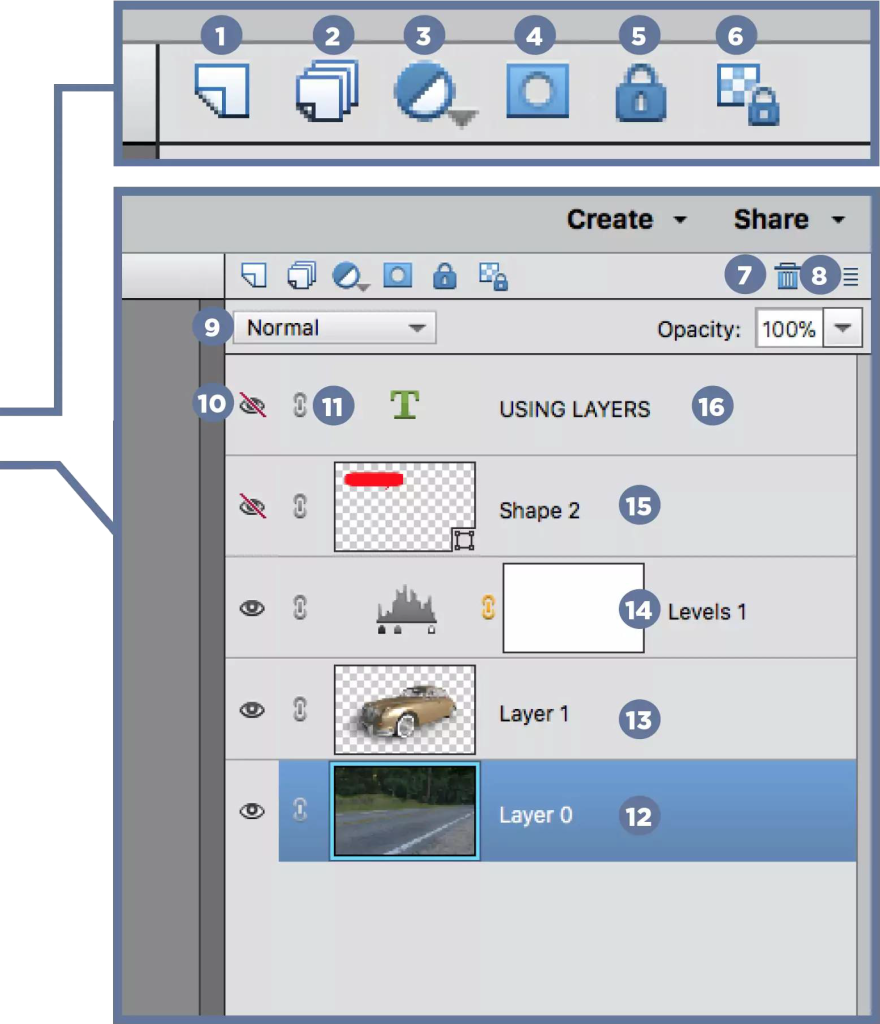
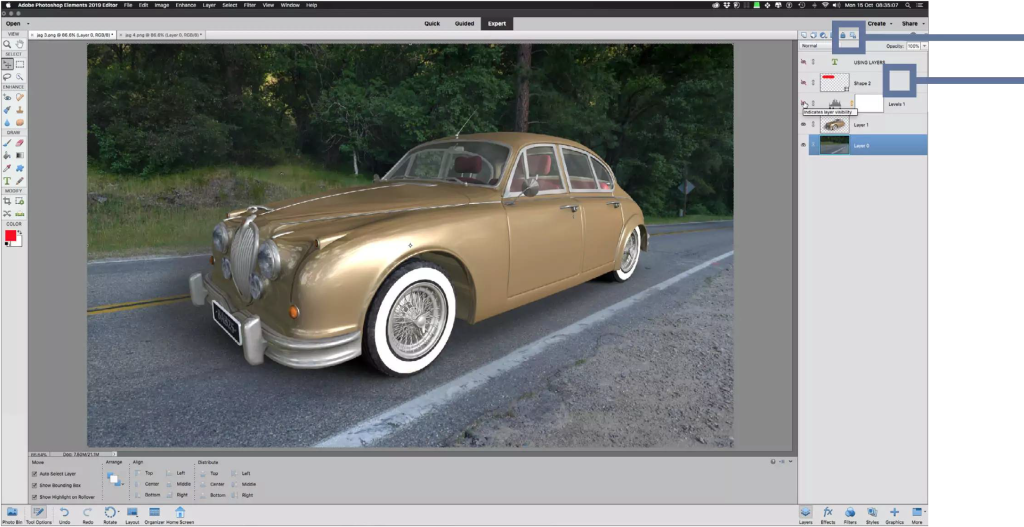
1 Create New Layer
You can click the Create New Layer button at the top of the layer panel, use the key broad shortcut or go to the file menu and choose Layer > New > Layer to add a new layer to the stack. You will be prompted to name the new layer. You can rename it at any time.
2 Create New Group
Sometimes it may be necessary to take a number of layers and group them to make things more manageable, as the number of layers increases in your document. You can highlight each layer you want and then press the Create New Group button to group them. Alternatively, you can go to the file menu and select Layer > New > Group
3 Fill or Adjustment Layer
Fills and Adjustments allows you to add colours, gradients and patterns to a layer. They also allow you to add adjustments such as Brightness and Contrast, Hue and Saturation and Levels. Adjustment layers affect the layers directly beneath them in the stack or they can be clipped to the one layer directly below them only.
4 Add Layer Mask
Each layer you use in a document can have a layer mask added to it. The mask is designed to let you hide or reveal specific parts of that layer only. Areas of the mask in white let the layer remain visible, while any areas of the mask in black hide that part of the layer. The rule of thumb is: white reveals pixels and black conceals them.
5 Lock all Pixels
Clicking this button locks the layer completely and no further edits can be made to it. You will also be unable to reposition the image on a locked layer.
6 Lock Transparent Pixels
If you click this button, any area of a layer that has no image pixels in it is considered transparent. An area that is transparent is then locked and no edits can be made so it remains transparent.
7 Delete Layer
The trashcan shaped button lets you delete any selected layers if you wish to remove them from the layer stack.
8 Panel Options
There are a number of menu options available here such as Rename Layer, Duplicate Layer, Delete Layer, Link Layers, Merge Visible and Merge Down.
9 Blend Modes
Blend Modes determine how the image colours on the layer interact with the layer below it. It can be changed for every layer individually or as part of a group for certain visual effects.
10 Visibility
The small eye icon on the left of each layer lets you turn that layer off so it is not visible. Any effects associated with that layer are also rendered invisible until the eye icon is clicked once more.
11 Link/Unlink Layers
This lets you link a number of layers so that any transformations and move commands you make are all applied to the linked layers at the same time.
12 Background
The Background layer is the default bottom layer. Whether it is an image you have opened or a new document, the Background layer is always partially locked until you choose to unlock it.
13 Standard Layer
A typical layer with pixel information displayed on it.
14 Adjustment Layer
An adjustment layer is designed to affect the layer below it. In this example, we have a Levels adjustment that alters the brightness and contrast of all the layers stacked below it.
15 Vector Layer
A vector layer contains scalable data such as shapes in the case of our example. A small icon in the lower right corner of the thumbnail indicates it is a scalable graphic.
16 Text Layer
The thumbnail of a Text layer displays a T to indicate the layer contains scalable text. The layer name also reflects whatever text is on that layer.


You must be logged in to post a comment.